
Below is a Ghiblified version of my profile image and while I was at it, I created a GI Joe version. Fireship has a pretty humorous take on it the new GPT-4o image generator on the Code Report.


Below is a Ghiblified version of my profile image and while I was at it, I created a GI Joe version. Fireship has a pretty humorous take on it the new GPT-4o image generator on the Code Report.
I asked GPT-4 to generate an image of a tyrannosaurus rex with feathers like a chicken… it did not disappoint on the first image it created. Subsequent photos weren’t as impressive.

ubuntu@rgvwebpro:~$ git push
git@github.com: Permission denied (publickey).
fatal: Could not read from remote repository.

Please make sure you have the correct access rights
and the repository exists.
The error message you’re seeing is typically related to SSH key authentication issues when trying to communicate with a GitHub repository. The steps to resolve this error and prevent it from occurring in the future are as follows:
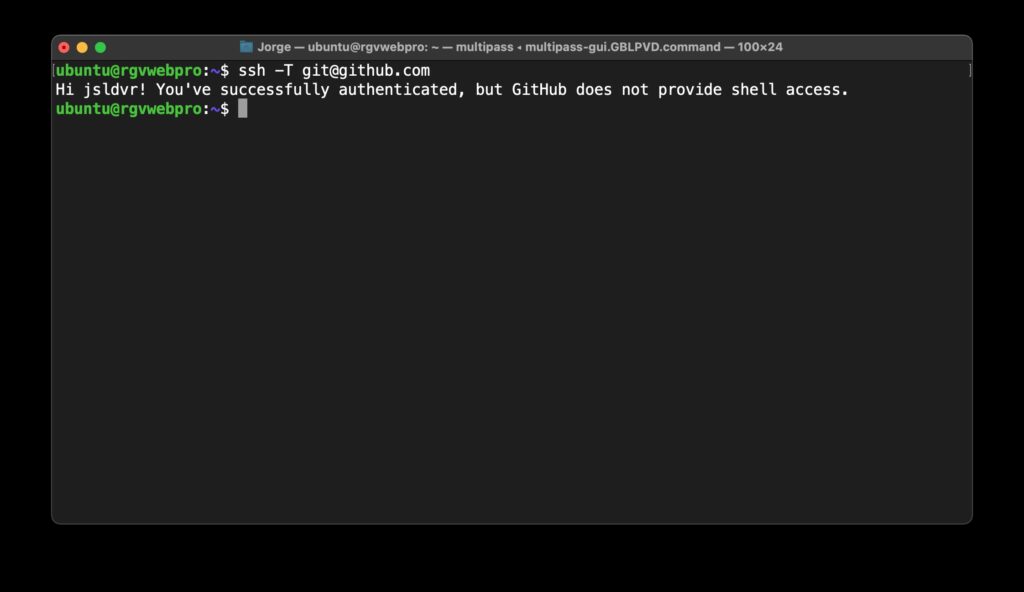
ls -al ~/.sshssh-keygen -t rsa -b 4096 -C "your_email@example.com"cat ~/.ssh/id_rsa.pub to display your public SSH key.eval "$(ssh-agent -s)".ssh-add ~/.ssh/id_rsassh -T git@github.comgit remote -vgit remote set-url origin git@github.com:username/repo.gitgit pushBy following these steps, you should be able to resolve the “Permission denied (publickey)” error when pushing to GitHub.

To list files and directories with detailed information using the ll command in the macOS terminal, you can create an alias for ls -als. Here’s how you can do it:
Open your terminal.
Run the following command to open your shell profile configuration file in a text editor. This file is usually .bashrc or .bash_profile.
nano ~/.bashrc
ll to execute ls -als.alias ll='ls -als'
Save and exit the text editor by pressing Ctrl + O to write the changes and then Enter, followed by Ctrl + X to exit.
Source your profile to apply the changes without having to restart the terminal.
source ~/.bashrc
Now you can use the ll command to list files and directories with detailed information, just like you would with ls -als. The alias will make your terminal experience more efficient and convenient.
Possible Issue: If the source has to be updated after each new terminal window.
Run echo $SHELL to check if bash or zsh.
If you’re using the zsh shell, the steps to create an alias for ll will be slightly different than for the bash shell. Here’s what you should do:
Open Configuration File: Open your zsh configuration file, which is usually ~/.zshrc, in a text editor. You can do this using the following command:
nano ~/.zshrc
Add Alias: Add the alias for ll by including the following line in your ~/.zshrc file:
alias ll='ls -als'
Save and Exit: Save the changes and exit the text editor (Nano) by pressing Ctrl + O to write changes, then Enter, and Ctrl + X to exit.
Apply Changes: To apply the changes to your current terminal session, run:
source ~/.zshrc
Now, whenever you open a new terminal session, the ll command should automatically be aliased to ls -als without needing to run source ~/.zshrc each time.
Title and body written by ChatGPT.

I suppose, all good things must come to an end. Additionally, I know–first hand–the cost of using Open AI’s ChatGPT, which is what powers AI Assistant.

Preface:
I’ve been using ChatGPT as a development tool as of late. Prior to searching for possible bug fixes, I’ll check to see if ChatGPT has an answer to what I would normally use as a query on Google or Bing. In this instance, I receive the following error after running service apache2 start.
Me:
AH00558: apache2: Could not reliably determine the server’s fully qualified domain name, using ::1. Set the ‘ServerName’ directive globally to suppress this message
ChatGPT:
This message is generated by the Apache web server and is indicating that the server is not configured with a fully qualified domain name (FQDN) for the current IP address.
To resolve this issue, you can set the ServerName directive globally in the Apache configuration file to specify the FQDN of your server. This can be done by following these steps:
/etc/apache2/apache2.conf or /etc/httpd/conf/httpd.conf.ServerName directive. If it is commented out (i.e., prefixed with a #), remove the # character to uncomment the line.ServerName directive does not exist, add it to the configuration file as follows:ServerName yourserver.example.comReplace yourserver.example.com with the FQDN of your server.
sudo service apache2 restart
After completing these steps, the message should no longer appear and the Apache web server should be able to determine the server’s FQDN.
Result:
The error did not repeat itself.

You must be logged in to post a comment.